Introduction
This document is a quick step-by-step guide for first-time users to install and configure a basic OpenNode Cloud environment and create virtual machines.
Prerequisites
- Only 64-bit server hardware is supported (for more memory and 64-bit guest support)
- Hardware Intel-VT or AMD-V virtualization support is required for KVM full virtualization to work (not required if using only OpenVZ linux containers)
- At least 8GB (single-root minimal schema) or 23GB (with separate /storage partition) harddisk/RAID device is needed for doing installation with automated partitioning
- If choosing manual partitioning then OpenNode itself needs about 1,5GB free space on root partition
- Automatic softraid setup option requires 2 identically sized harddisks
- At least 4GB of memory is needed - we recommend 8GB if running also several KVM guests
- CDROM device for booting installer from the OpenNode CD or PXE for network based installs
Install OpenNode OS
- Download and burn OpenNode OS ISO installer image
- Boot server from OpenNode OS install CD
- Follow installer on-screen instructions
- Choose automatic partitioning (if server has hardware RAID or RAID is not needed). Automated partitioning creates all needed partitions and LVM volumes on servers first harddisk or RAID disk - if server has several harddisks or RAID disks and there is a need to spread initial partitions over these then manual partitioning is needed (or migrating LVM volumes later manually).
- Choose automatic partitioning with softraid setup (if server has no hardware raid and softraid setup is desired)
- Follow installer on-screen instructions to complete the installation and reboot
Postinstall tasks
As OpenNode ISO installer won’t expand server storage partition to use all available free space - so you can now decide how much and where the free storage space should go. Here is an example how to expand /storage and /vz partitions online - while partitions are mounted and used:
# First - find out how much free space you have available to donate ...
# lookup for "VFree" column - this shows how much free space you have left
# on selected LVM Volume Group
vgs

# Adding 50GB for /storage (KVM images/templates)
lvextend -L+50G /dev/VolGroupL0/storage
resize2fs /dev/VolGroupL0/storage

# Adding 50GB for /vz (OpenVZ images/templates)
lvextend -L+50G /dev/VolGroupL0/vz
resize2fs /dev/VolGroupL0/vz
VM management howto
Download VM templates
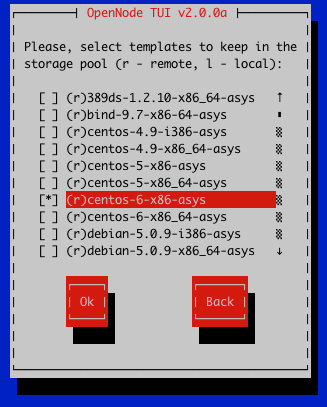
We do provide a comprehensive library of OpenVZ Linux OS templates packaged into OVF format - which can be downloaded with the help of OpenNode TUI utility. In order to do that please go through the following steps:
- Login into server console as root user - either locally or remotely by using ssh - and fire up OpenNode TUI local management menu by executing: opennode
- Choose “Manage->Templates->Download”
- Choose either OpenVZ or KVM images download
- Mark templates in list you want to download/keep
- Hit OK button for template download
- Tip! You can background the download screen by hitting CTRL+A+D
Create VM
- Fire up OpenNode TUI menu by executing ‘opennode’ on server console
- Choose ‘CreateVM->openvz’ for OpenVZ Linux templates
- Choose template you want to be basis for the current VM
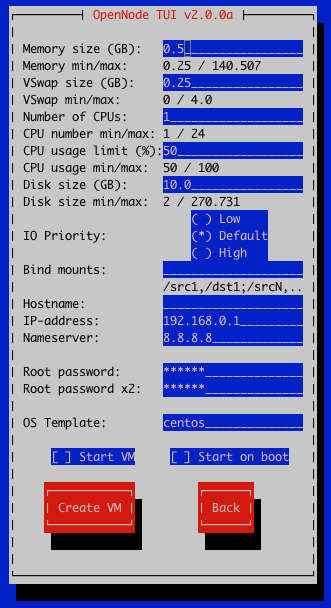
- Fill the ‘Create VM’ form with required parameters - like:
- Memory size
- Vswap size
- Number of CPU cores
- Disk size
- Hostname
- IP addres
- DNS server(s)
- VM root password
- Hit ‘Create VM’ button and observe progress messages in terminal background
Local management tools
- You can use TUI VM management interface by choosing: ‘Manage->VMs’ - which provides most common VM lifecycle management functions
- You can also use hypervisor consoles - virsh or vzctl - by choosing: ‘Console->KVM or OpenVZ’
- Here are some vzctl and virsh examples:
# Listing linux containers with vzlist
vzlist -a
# Entering into container
vzlist enter CTID

# Listing QEMU/KVM VMs with virsh
# omit virsh prefix if using TUI KVM/virsh console
virsh list --all
OMS (beta) install
NB! OpenNode Management Server (OMS) needs minimum OpenNode OS 6 Update 2 for proper operation.
OpenNode Management Server appliance is delivered to OpenNode OS host as a VM image. OpenNode TUI menu provides functions for easy OMS VM download and install - as well as generating current HN (host node) registration request for OMS.
Updating OpenNode OS to latest stable version
In order to update OpenNode OS to latest stable version you must do the following:
yum clean all && yum update # which updates OpenNode OS to latest stable version
NB! yum update won’t work if current running vzkernel is older than 61.1 - as newer OpenVZ packages require newer kernel than 61.1. - but they can’t remove older kernel because its in use. For a workaround you must first update kernel and then base system.
yum install vzkernel
reboot
yum update
Downloading OMS VM image
For OMS download please fire up OpenNode TUI by executing ‘opennode’ on server console and choose ‘OMS (beta) ->Download OMS image’ from the menu.
Installing OMS VM image
For installing OpenNode Management Server please launch OpenNode TUI menu and choose ‘OMS (beta)->Install OMS image’. Please fill in required form fields for OMS VM creation like:
- OMS appliance hostname
- OMS appliance IP address
- Nameserver to use
- OMS appliance root password
If possible give to OMS VM instance around 1GB of memory and 1GB of swap - for disk space 5GB should be sufficient. As OMS can be also quite CPU intensive - assigning 1-2 CPU cores and allowing 100% CPU usage would be the way to go. It also makes sense to check “Start VM” and “Start on boot” options - in order to make OMS VM autostarted on HN boot.
OMS VM and host nodes (HNs) configuration
Registration and communication between OpenNode Management Server and OpenNode OS hosts requires that all hostnames involved are resolvable within local network for OMS and for each OpenNode host. Ideally one should have a local DNS server where all OpenNode hosts and OMS hostnames would be added - but if that is not a case then same result can be achieved by adding relevant hostnames into /etc/hosts files inside OMS VM and on every OpenNode host.
# Inside OMS VM - open /etc/hosts and add ALL OpenNode hosts IP mappings
mcedit /etc/hosts
--- EXAMPLE ---
192.168.1.200 node1.local.lan node1
192.168.1.201 node2.local.lan node2
--- EXAMPLE ---
# Testing out the resolver
ping -c 1 node1.local.lan
ping -c 1 node2.local.lan

# On EVERY OpenNode OS host - open /etc/hosts and add OMS hostname/IP
mcedit /etc/hosts
--- EXAMPLE ---
192.168.1.100 oms.local.lan oms
--- EXAMPLE ---
# Testing out the resolver
ping -c 1 oms.local.lan
Ensure that OMS service is running
Before proceeding with OMS access and node registration please take a moment to verify that OMS service itself has been started and running inside OMS VM:
# enter the OMS VM console
vzctl enter OMS_VM_VEID

# check oms service
systemctl status oms

# IF Active: failed - then service is not running!
oms.service - Opennode Management Service
	  Loaded: loaded (/usr/lib/systemd/system/oms.service; enabled)
	  Active: failed (Result: exit-code) since Fri, 17 May 2013 14:40:23 +0400; 4min 7s ago
 	  Process: 123 ExecStart=/opt/oms/bin/omsd --log /var/log/omsd (code=exited, status=203/EXEC)
	  CGroup: name=systemd:/system/oms.service

# NB! OMS VM build from 5th May 2013 is broken - /opt/oms/bin/omsd missing from build!
# Workaround for that bug is to use OMS dev update script:
yum install mysql-server mysql-devel -y
cd /opt/oms && ./update.sh

# Enabling and re-starting OMS service
systemctl restart oms
systemctl enable oms
systemctl status oms
OMS access
OpenNode Management Server provides two distinct user interfaces - OMS cli shell and ajax web UI (OpenNode Console).
- OMS shell can be accessed over ssh like: ssh opennode@oms_vm_ip -p 6022
- OMS web UI - eg OpenNode Console - can be accessed like: https://oms_vm_ip_or_hostname
- NB! Default OMS user is ‘opennode’ with password set to ‘changeme’
Changing default OMS account password
For changing OMS opennode user password you need to login into OMS VM as root user - either by ssh or using ‘vzctl enter CTID’ on HN.
# Lookup OMS VM ID (from CTID column)
# on OpenNode host where you installed OMS VM
vzlist -a
--- EXAMPLE ---
CTID      NPROC STATUS    IP_ADDR         HOSTNAME
103         34 running     10.211.55.103  oms.appliance
--- EXAMPLE ---

# Enter the OMS VM by CTID
vzctl enter 103

# Changing OMS opennode user password
cd /opt/oms/ && ./bin/passwd opennode
Registering HNs with OMS
Registering OpenNode hosts with OpenNode Management Server is a 2-step process:
- Creating a registration requests on OpenNode hosts
- Accepting registration requests in OpenNode Console
Registration requests are created on OpenNode hosts by using local OpenNode TUI management menu: choose ‘OMS->Register with OMS’ and enter the OMS instance hostname. NB! Check for salt-minion process on server afterwards and start it if not yet started!
service salt-minion status
service salt-minion start
chkconfig salt-minion on
In order to view and accept OpenNode hosts registration requests in OpenNode Console please click on “Host management” button from upper-right corner. That opens OpenNode settings window where host requests can be managed. After accepting hosts please hit “Reload” button and later if hosts wont appear on ONC left-side pane please hit your webbrauser reload button.